
In this Blog we will learn how to build a custom Lightning Web Component (LWC) for Salesforce Screen Flows, with emoji feedback, file uploads, and date picker features.
Do you know what Is a Salesforce Screen Flow?
Salesforce Screen Flows are powerful automation tools that guide users through a series of steps, like filling out forms or updating records. They help automate processes with a friendly user interface all without any Apex code.

Why Use a LWC in a Flow?
As we discussed Salesforce Screen Flows are type of flow that allows users to interact with the system through a series of screens. Screen flows usually guide users through a business process, prompting them to input data, make selections, or view information displayed on the screens. But sometimes standard flow components aren’t enough! For an example what if we want more dynamic or custom user experience? Sometimes, the standard flow screen elements (like text fields or dropdowns) are not enough when we need a more custom or interactive experience.
That’s where Lightning Web Components (LWC) come in. In this blog, we will understand how to build an LWC that can be used in a screen flow. These are called Flow Screen Components. To use an LWC in a flow, we make it a Flow Screen Component by following some setup rules.
Use Case:
Imagine a Service agent / customer is closing a support case and needs to perform that quickly:
- Rating their satisfaction with a Emoji (🙂 😐 🙁), attach a screenshot or file from the conversation, or pick a follow-up date using a calendar.
- Standard flow components can’t handle Emoji ratings or file uploads smoothly.
- So, you can build a custom LWC that will shows clickable smiley faces for feedback, Allows file uploads, Includes a date picker.
This will make the whole process smoother, faster, and more user-friendly — all in one step.
Since standard flow components can’t handle these tasks, we need to build a custom LWC that supports emoji-based feedback, file uploads, and a date picker—all within a single, user-friendly interface. Then we need to add this LWC inside in our screen flow which will create a smooth and interactive experience for a Service agent/ Customer.

How to Build a LWC to use in Screen Flow
To create the LWC Component, you can use VS Code to create your component folder with the usual .js, .html, and .js-meta.xml files. Make sure you are always using @api for public variables and also Use FlowAttributeChangeEvent to return values back to the flow.
To be used in a screen flow, an LWC must :
- Have isExposed set to true in the .js-meta.xml file
- Include <target>lightning__FlowScreen</target> in targets
- Use @api for properties to pass data in and out
- Use FlowAttributeChangeEvent to return output to the flow
Step 1: Add the Flow Interface In the JavaScript file
import { LightningElement,api } from ‘lwc’;

import {FlowAttributeChangeEvent} from ‘lightning/flowSupport’;

export default class LwcComponentForFlow extends LightningElement {

@api satisfaction;

@api uploadedFile;

handleSmileClick(value) {

    this.satisfaction = value;

    this.dispatchEvent(new FlowAttributeChangeEvent(‘satisfaction’, value));

}

}
Step 2: Design Your HTML Template
<template>

   <div class=”smiley-container”>

    <button onclick={handleSmileClick}>🙂</button>

    <button onclick={handleSmileClick}>😐</button>

    <button onclick={handleSmileClick}>🙁</button>

   </div>

</template>
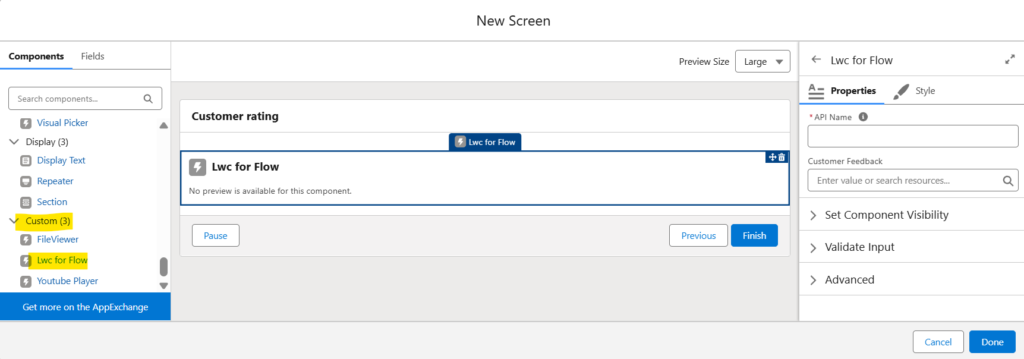
Step 3: Update the Meta.xml Configuration
For using the Component in Flow, we need to add the Flow target:
<?xml version=”1.0″ encoding=”UTF-8″?>

<LightningComponentBundle xmlns=”http://soap.sforce.com/2006/04/metadata”>

    <apiVersion>64.0</apiVersion>

    <isExposed>true</isExposed>

    <masterLabel>Lwc for Flow</masterLabel>

    <description>Lwc for flow</description>

    <targets>

        <target>lightning__FlowScreen</target>

    </targets>

     <targetConfigs>

        <targetConfig targets=”lightning__FlowScreen”>

            <property name=”satisfaction” type=”String” label=”Customer Feedback”/>

        </targetConfig>

    </targetConfigs>

</LightningComponentBundle>
Step 4: Add the LWC to Flow:
- Go to Flow Builder.
- Click on the ‘+’ icon and Select Screen Element.
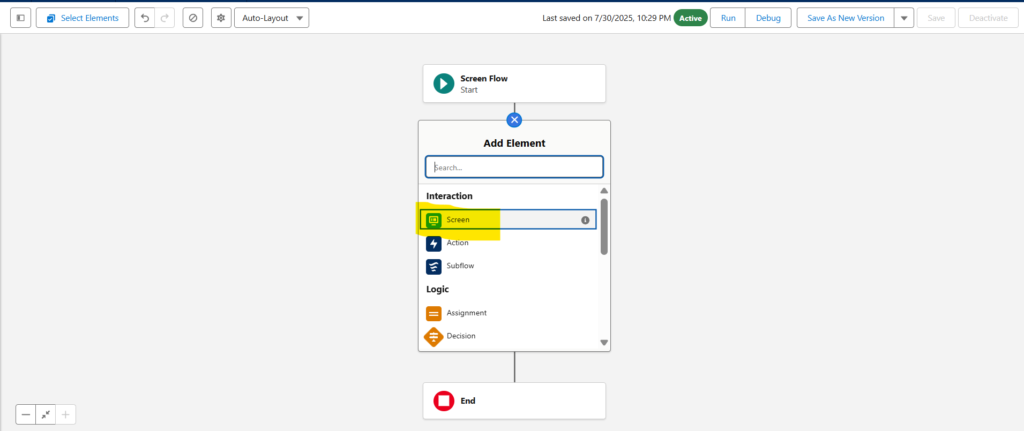
- Under Custom Components, select and drag your LWC component.
- Map the input/output variables.
- Save and test your flow.
Best Practices
- Make input/output variables clear and well labelled.
- Validate inputs inside the component.
- Test in both desktop and mobile views.
- Keep components reusable and modular.
Conclusion
Using LWC inside Screen Flows allows developers to build rich, custom UI experiences while still benefiting from Flow automation. With the right setup and best practices, you can create reusable components that improve productivity and user satisfaction. Happy coding!
FAQs
1. Can we use any LWC inside a Screen Flow?
To make an LWC usable in a flow screen, you need to configure the component’s metadata to include the lightning__FlowScreen target and optionally define targetConfig properties for input and output.
2. Can I call Apex methods in my flow LWC?
Yes, we can call Apex methods from a Lightning Web Component (LWC) that is embedded within a flow. We can achieve this by using an Apex method that is exposed to the flow through the @InvocableMethod annotation. The flow can then invoke this Apex method, passing data to it and receiving results back.
3. Can I modify Flow variables from within the LWC?
Yes, wcan modify Flow variables from within a Lightning Web Component (LWC) when the LWC is embedded within a Flow screen. This is achieved by utilizing specific mechanisms designed for communication between an LWC and its parent Flow.
If you want to know more about LWC please click here.
Are you preparing for next job ? check the latest Interview Question here. Happy reading 🙂
