We all know how important it is to keep track of the battery cycle in our phones because it is the only source to run the device. In this tutorial, we’ll look at how to monitor the battery level and state in flutter applications using the battery_plus package.
About battery_plus
A Flutter plugin for getting various battery-related information from the device on which the app is running. This plugin is applicable to all kinds of platforms, including Android, iOS, macOS, web, Linux, and Windows.
Adding dependency
To install the package into our flutter project, we need to add it to pubspec.yaml and run the pub get command.
dependencies:
  battery_plus: ^2.0.2
Import Package
We can use the classes and methods by importing the package after it has been installed into our flutter project.
import 'package:battery_plus/battery_plus.dart';Now that the package has been set up, Let’s look at how to use it
Create a Battery class Instance:
The Battery class is the package’s core class and contains most of the methods, we should create an instance of it as seen under.
//instantiate it
var _battery = Battery();
Get the Battery level or Percentage:
We can access the battery level by using battery.batteryLevel after creating an instance of the battery class.
// Get current battery level
print(await _battery.batteryLevel);
Get Battery State:
There are four different states accessible in this package to indicate the battery’s current status. They’re full, charging, discharging, and unknown.
- BatteryState.full: The battery is completely full of energy
- BatteryState.charging: The battery is currently storing energy
- BatteryState.discharging: The battery is currently losing energy
- BatteryState.unknown: The state of the battery is unknown
  _battery.onBatteryStateChanged.listen((BatteryState state) {
    //battery state will be listen here
      setState(() {
        _batteryState = state;
      });
    })
Check Battery Save mode:
Using the _battery.isInBatterySaveMode, we can see if the battery is in save mode or not.
final isInPowerSaveMode = await _battery.isInBatterySaveMode;Now that we have a better understanding of the battery plus package and how to use it, we can go on to the basic implementation. Create a new flutter project and replace the boilerplate code with the following code. Run the app to see the output.
//Check the Battery Level and state using the batte_plus - FlutterAnt
import 'dart:async';
import 'package:battery_plus/battery_plus.dart';
import 'package:flutter/cupertino.dart';
import 'package:flutter/material.dart';
void main() {
runApp(const MyApp());
}
class MyApp extends StatelessWidget {
const MyApp({Key? key}) : super(key: key);
// This widget is the root of your application.
@override
Widget build(BuildContext context) {
return MaterialApp(
title: 'Flutter Demo',
debugShowCheckedModeBanner: false,
theme: ThemeData(
primarySwatch: Colors.cyan,
),
home: MyHomePage(),
);
}
}
class MyHomePage extends StatefulWidget {
const MyHomePage({Key? key}) : super(key: key);
@override
_MyHomePageState createState() => _MyHomePageState();
}
class _MyHomePageState extends State<MyHomePage> {
final Battery _battery = Battery();
BatteryState? _batteryState;
StreamSubscription<BatteryState>? _batteryStateSubscription;
int _batteryLevel = 0;
late Timer timer;
bool? _isInPowerSaveMode;
@override
void initState() {
super.initState();
getBatteryState();
checkBatterSaveMode();
Timer.periodic(const Duration(seconds: 5), (timer) {
getBatteryLevel();
});
}
@override
Widget build(BuildContext context) {
return Scaffold(
appBar: AppBar(
title: const Text('Battery Plus'),
),
body: Center(
child: Column(
mainAxisAlignment: MainAxisAlignment.center,
children: [
Text('Battery State: $_batteryState', style: const TextStyle(fontSize: 18),),
Text('Battery Level: $_batteryLevel %', style: const TextStyle(fontSize: 18)),
Text("Is on low power mode: $_isInPowerSaveMode", style: const TextStyle(fontSize: 18) )
],
),
),
);
}
@override
void dispose() {
super.dispose();
if (_batteryStateSubscription != null) {
_batteryStateSubscription!.cancel();
}
}
void getBatteryState() {
_batteryStateSubscription =
_battery.onBatteryStateChanged.listen((BatteryState state) {
setState(() {
_batteryState = state;
});
});
}
getBatteryLevel() async {
final level = await _battery.batteryLevel;
setState(() {
_batteryLevel = level;
});
}
Future<void> checkBatterSaveMode() async {
final isInPowerSaveMode = await _battery.isInBatterySaveMode;
setState(() {
_isInPowerSaveMode = isInPowerSaveMode;
});
}
}
//Check the Battery Level and state using the batte_plus - FlutterAnt
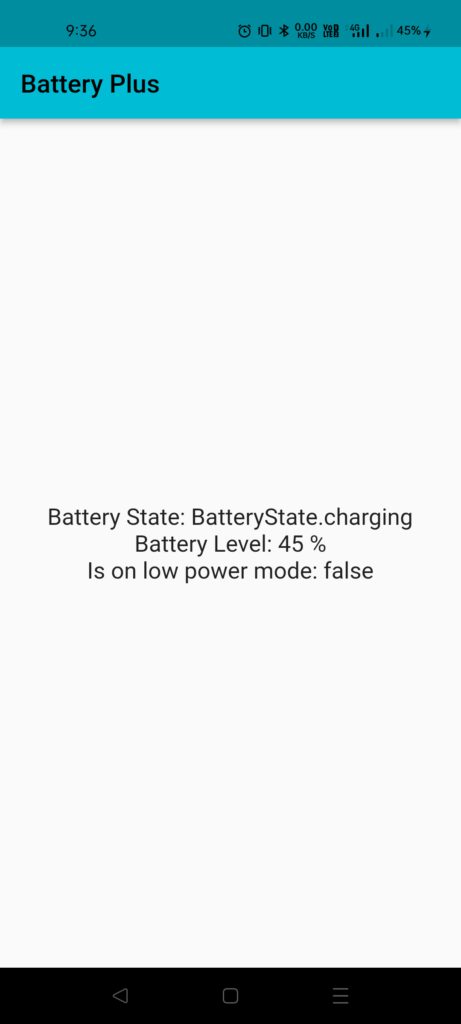
//www.flutterAnt.comOutput:
The output can be seen in the image below after the application has been successfully run.
For more information about the batter_plus click here
Thanks for reading … 🙂
